Method Statement
  • Check drive tool for wear. If worn replace.
  • Check the installation location for known underground services. If service location are unknown, careful pre-boring with an earth auger or hand digging will discover services.
  • Set out location of the screw pile, establishing location of junction box and final pole orientation.
  • In hard clay soils or shale, pre-auger soil with an earth auger (refer following schedule) to full pile depth and reverse auger out of hole, ensuring minimal soil removal.
  • During screw pile installation the helix rotation will pull the fin assembly into the ground vertically. Once the fins have engaged the ground they must not be allowed to spin during installation.
  • Install the screw pile until fins are touching the ground, rotate the fins to the correct location andcontinue installation until pile is fully installed.
  • When final depth is achieved, ensure cable slot “V” indicator is pointed towards junction box.
  • Ensure that a fin plate is not blocking the cable entry slot.
  • Stand up lighting column and fix to hold down bolts, adjust nuts to level column.
  • Vermin protection may be carried out using expanding polyurethane foam. Fill in the gap between the light pole base plate and screw pile drive plate.

Product Installation

Starfin Pre-Drilling Paramaters Schedule

Click images to enlarge
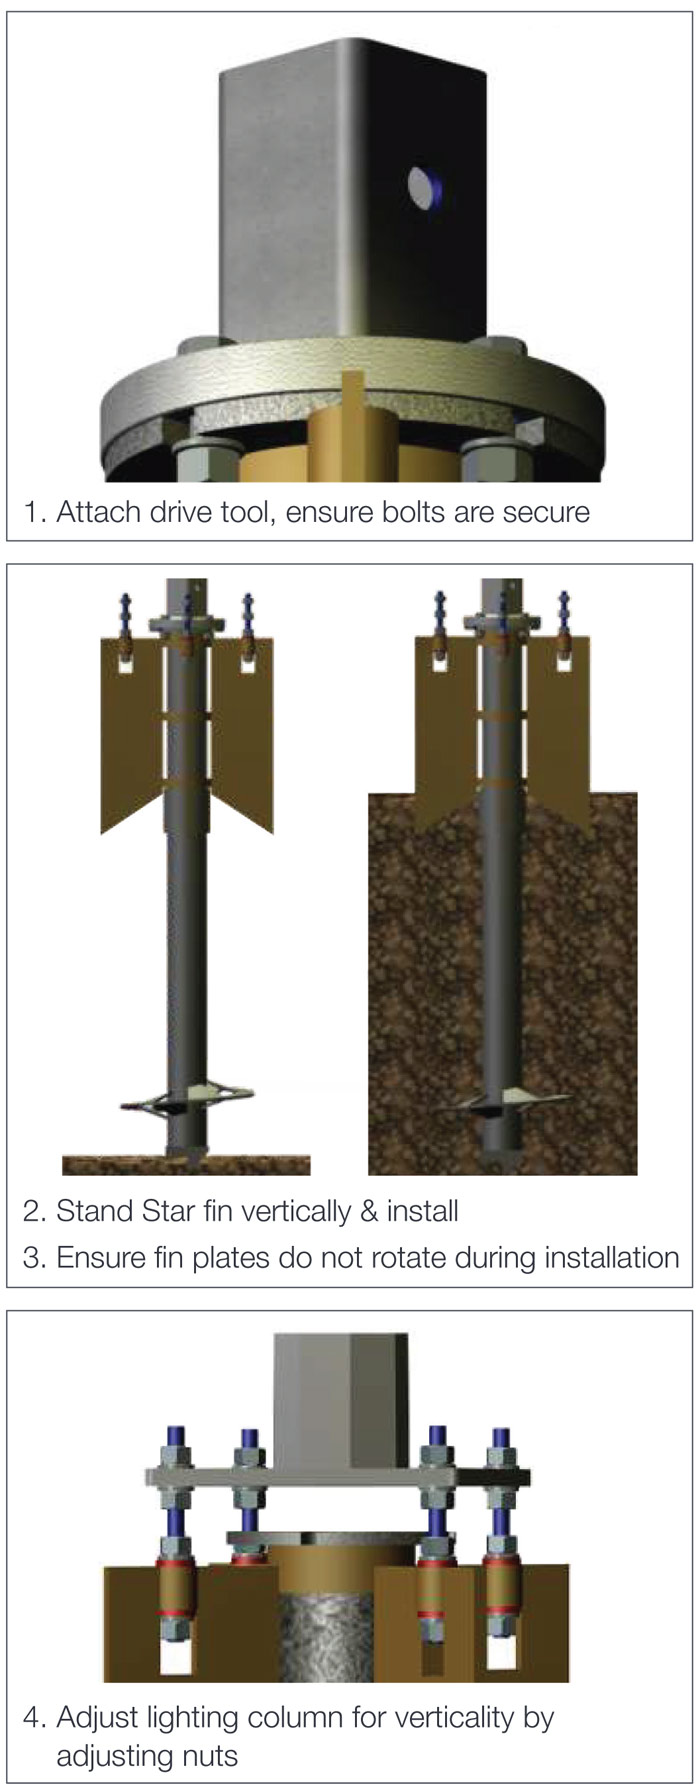
 

Installing Star Finned Screw Piles On Site

  • Always check the drive tool for wear, replace if bent or out of shape.
  • Check and confirm underground services and correct column set-out.
  • Bolt the screw pile to drive tool (only used Gr8.8 bolts) and fix to kelly bar: ensure bolt heads will clear the fins during installation. Check to ensure that the fin assembly top swivel ring and drive plate interface is well greased.
  • Manoeuvre the installation equipment to locate screw pile position, ensure hold down bolts are facing in the right direction, to suit the lighting column’s base plate and orientation.
  • Screw the shaft into the ground, approx. 300-500mm, stop and adjust the equipment to ensure vertical alignment of the screw pile shaft. Do not attempt to straighten the screw pile at any depth exceeding 600mm as this may result in the shaft bending.
  • Apply constant downward pressure, rotation and alignment until the fin assembly is in contact with the ground; stop, remove any spoil and turn the fin assembly to ensure that the fins will not interfere with the cable entry slot’s final position. Note: location of cable slot indicator ‘V’ on drive plate.
  • If screw pile stalls during installation, firstly unwind screw pile until helix is near surface and re-install, if this fails after several attempts, remove screw pile altogether and pre drill with earth auger then reinstall screw pile.
  • Continue the installation process until the screw pile drive plate is flush with the ground – ensure cable slot is facing towards junction box.
  • Unbolt the drive tool from the screw pile.
  • Stand up lighting column and fit to screw pile bolts.
  • Ensure future underground cable excavation will not interfere with fins.
  • Always keep trench excavation to a minimum and re-compact soil on completion of cable laying.
  • If after installation, soil around fin assembly is loose, compact loose soil with a crow bar head or vibration plate.
Precautions
  • Do not over torque screw pile during installation. If the ground is very hard always pre-drill as over torquing will cause the drive plate to shear off. This weak point is designed into the pile to limit damage to the pile shaft from over torquing.
  • During installation ensure fins do-not rotate with screw pile shaft. The fin assembly is designed to be pulled into the ground vertically, any fin rotation in the ground may cause them to bend and render the screw pile unusable. Always check to ensure fin assembly top swivel ring and drive plate interface is well greased with anti-seize prior to installation.
  • During screw pile installation always maintain verticality. Non vertical installation will damage the drive tool and possibly destroy the screw pile drive plate.
  • Always ensure soil around fin assembly is well compacted after installation. Avoid creating a soil void for future water ponding.
  • Star finned screw pile installation is limited to soil conditions which can be pre-augered. If preaugering is not possible the star finned product is not suitable for this location.